By J Floor Anthoni (2000-2005) www.seafriends.org.nz/phgraph/water.htm
Water is a substance which is 800 times denser
than air. As soon as light enters the water, it interacts with the water
molecules and suspended particles to cause loss of light, colour changes,
diffusion, loss of contrast and other effects. A photo taken under water
at one metre distance is not unlike a telephoto above water at 800 metres
distance, both looking bluish while lacking contrast. The way light changes under water is responsible
for the typical under water 'atmosphere' and it offers creative possibilities
not found on land. This chapter shows how light changes as it enters the
water. It also discusses techniques to reduce unwanted scatter in photographs
and how to restore colour.
Surface
effects The
shape of the water is decisive on how the light passes through it. Coming
from an optically less dense medium (air) and entering a denser one (water),
the light is partly reflected back while partly entering the water. Depending
on the shape of the water, the light forms crinkle patterns or becomes
diffused randomly in all directions.
The amount of light that is reflected upward depends strongly on the
height of the sun (place on Earth, time of day and season) and the condition
of the sea. A rough sea absorbs more light whereas a mirror-like sea reflects
more. In the tropics, the sun stands straight overhead at mid-day, resulting
in little loss. In temperate seas during winter, the light diminishes by
as much as 3 f-stops immediately under the surface.
As a matter of interest, the reflected light is partly polarised (horizontally)
and so is the part that enters the water (vertically). Polarisation is
maximal in the early morning and late afternoon when the sun stands low
in the sky. The vertically polarised light entering the water makes objects
less shiny, more colourful, and can be used creatively, for instance to
capture the deep colours of shiny fishes in natural light.
The
diagram shows the theoretical loss of light due to reflection. The top
left quarter shows sun rays reaching the water's surface. The top right
quarter shows the amount of light reflected and the bottom right quarter
that of light transmitted. The hours shown are not those of the clock but
of the height of the sun. Only at angles less than 30º with the horizon
('four-o-clock') is the light reflectance significant and does loss of
light become noticeable under water. However, in practice, and perhaps
due to waves and the light diminishing towards sunset/dawn, the light under
water diminishes much more quickly. At 'four-o-clock' one loses a complete
f-stop (50%).
Note how the light enters the sea at a steeper angle
(blue lobe), which means that most of the time, the light comes from almost
straight above, which limits natural lighting options. The light reluctantly
enters a dive mask for instance or poorly lights subjects from their sides.
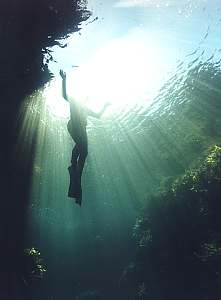
Crinkle patterns When the water is very calm, its undulations resemble weak positive
and negative lenses, the negative ones diffusing the light, resulting in
dark patches while the positive ones focussing the light into bright patches.
This effect also causes the creative 'cathedral' rays, sometimes visible.
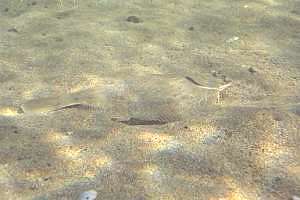
A sand flounder enjoying the extra camouflage afforded by the rapidly
moving light patches, known as crinkled light. In an environment where
everything moves, even its movements are no longer noticeable!
This photo was taken with a warming filter and short time exposure,
through a 50mm lens.
To increase the crinkle effect:
Choose very calm water in sheltered spots.
Stay close to the surface
Use ambient light only. No flash light.
Use short time exposures
To decrease the crinkle effect:
Choose an overcast day
Choose ruffled water
Work deeper down
Use flash light to overpower ambient light
Use long time exposures
To increase the sun rays effect, also known as
cathedral light:
Do as for the crinkle effect but also:
Choose a dark background such as a rock wall
Choose a dirty water patch with suspended particles
Shoot close to the edge of the light
Aim the camera towards the light
Avoid shooting directly into the sun. Hide the sun behind an object.
Shoot during a clear blue sky; avoid clouds
Use a wide angle lens
Deeply penetrating sun 'rays' are rare, so use your chance well!
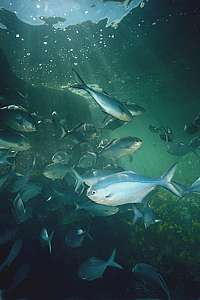
Blue Maomao fish lazing in the mid-day sun in a narrow channel near
Goat Island, in the Goat Island marine reserve, New Zealand.
The example shows how the sun ray effect has been captured by positioning
oneself near the edge of the light, close to a vertical wall and shooting
towards the sun in a blue sky. A fill flash was used to bring colour to
the foreground and to make fish visible in the shade. No colour correction
was used in order to accentuate the blue colours of the fish.
Note that some clouds are visible in the sky. This picture would have
been better without them.
Lens: 15mm
A snorkeldiver enjoys herself in a shallow alcove of Ngaio Rock,
Poor Knights Islands, New Zealand.
This photo was taken with a full daylight correction filter before the
lens, shooting upward towards the sun but hiding it behind a steep rock
face. This cove was carefully selected as an under water 'studio': a steep
wall on both sides to make the sun rays stand out against a dark background;
and some weeds in the dark lower right corner to frame the picture. The
sky is entirely blue. No flash light was used.
Lens: 15mm
The
water's surface has further consequences for how light continues its path.
The diagram shows how light is broken (diffracted) by the surface. A vertically
incident ray passes without breaking but as the incident angle (height)
becomes less, the light ray is bent to descend more steeply. Finally, light
from the horizon passes at an angle of about 45 degrees or more precisely
half of Snell's Angle, named after the Dutch astronomer Snell who discovered
and described this effect (see separate box). To photograph the full circle
from below, one needs a fish-eye lens of focal lens less than 12mm. A 15mm
wide angle lens captures a good part of it.
The consequence of Snell's Window or Snell's Circle is that the light
always shines down steeply, even when the sun stands low in the sky. This
makes ambient light difficult for lighting subjects. Top lighting is difficult
to use creatively, making strobes necessary to bring the light in from
the front.
Snell's window is the circle through which the sky is visible. The
area around it is a reflection of the seascape and is usually much darker.
This light contrast becomes worse in clouded or semi-overcast conditions,
causing problems for wide angle lenses. So treat blue sky weather as wide
angle weather, particularly when also the water is calm. Look out for steep
rock faces to find cathedral light. Try to hide the sun.
Proper use of technique shows cathedral light and Snell's
window. The sky is blue without a single cloud. It is 08:00 and the sun
comes in at a low angle, the lake's water is perfectly still. The diver
obscures the sun as sunrays radiate all around. 13mm fisheye.
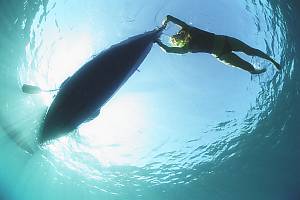
A less perfect result as the water is ruffled, creating a
bright patch around the canoe that hides the sun. But the subject is perfectly
framed inside Snell's window. 13mm fisheye.
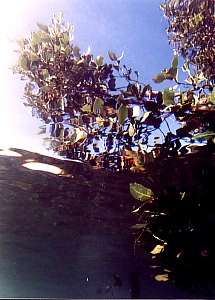
In the example, a mangrove tree has been photographed
from below, offering a slightly distorted view of the world above. Snell's
Circle runs through the middle of the frame and the horizon is the edge
between light and dark. The bottom part of the picture reflects the bottom
but about 2 f-stops darker. The photo would have been improved with a graduated
grey filter correcting for one f-stop and by applying a half intensity
fill flash to the branch in the foreground. At the time this photo was
taken, these problems were not apparent.
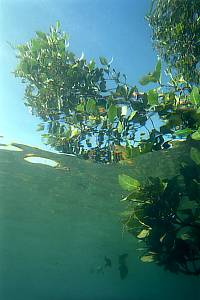
On the right the same image corrected by techniques explained
in the Digital Darkroom chapter. When shooting
negative film, one can over expose by one f-stop, which gives one the opportunity
of applying a grey filter in the Digital Darkroom.
The
Dutch astronomer Willebrord van Roijen Snell (1580-1626) discovered the
important law of light diffraction between two media having differing refractive
indexes or optical densities or light speeds. The Dutch physicist Christiaan
Huyghens later formulated other optical laws in his treatise on light.
Snell formulated that light is refracted (bent) towards the optical axis
perpendicular to the plane between the media when going from a less dense
to a denser media so that
{sin (a2)}/{sin (a1)}=n1 /
n2 where a1=incident angle, a2=refracted
angle, n1=density of air (=1.00), n2=density of water (=1.33)
As angle a1 approaches 90 degrees, angle a2
reaches its maximum beyond which total reflection occurs (going from water
to air). This critical angle or Snells 'window' is just over 48 degrees
to both sides of the vertical:
Huyghens suggested to look at light beams as travelling fronts
of light, like soldiers marching in file can be considered as rows of soldiers.
When a light front or row of soldiers meets a denser medium, it is slowed
down, causing the front/row to bend and travel/march into a different direction.
Note that winds meeting a land mass on an angle, behave similarly.
Scatter
and diffusion The way light
diffuses as it interacts with matter, depends on the size of the particles.
For the ultra small water molecules, blue light is bounced off in all directions
equally, while the rest of the light passes through normally. This diffusion
was described by the physicist Rayleigh and explains why both the sky and
the sea look blue. The diffused blue light appears to come from all directions,
particularly deeper down and it has the effect of reducing contrast
while dominating the natural colours.
Particles as large as phyto plankton but not visible to the naked eye
(0.1 to 10 micrometre) act like mist particles, reflecting all colour components
of the light back to where it came from. This effect makes driving in the
mist an undertaking. This form of diffraction was first described by the
physicist Tindall. It causes images to blur but it also offers creative
opportunities both above and under water.
Finally, the snow effect that plagues under water photographers and
which is called scatter, is light bounced off visible particles like zoo
plankton organisms or even their shed moults. Such 'snow' or 'jelly' or
'snot' often collects close to the surface and should be avoided.
To minimise ambient scatter:
work deeper than 3m down
shoot across the ambient light
avoid ocean swell that stirs up sand and dust
use long exposures (0.25-1 second). Particles that move will disappear
from the image
use continuous movie lights rather than strobes
move cautiously, make no dust
move against the current: your dust drifts away behind you
dive alone: one diver creates less disturbance and has more patience.
use wide angle lenses, and stay close to the subject
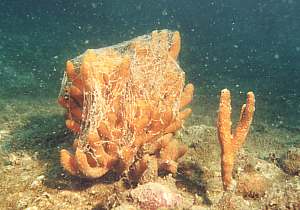
This orange finger sponge was photographed in a rather dusty
environment using an electronic strobe, which accentuates environmental
dust particles.
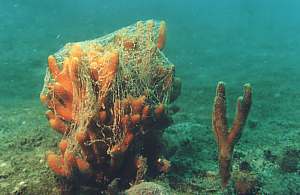
The same orange finger sponge, photographed with continuous
movie light and a sufficiently long time exposure. Although the dust particles
are still there, causing scatter, they do so while moving across the image,
leaving no visible scatter trail. Current and wave action are needed to
make them move.
Scatter
from strobe light Strobelight
scatter is caused by brightly lit small objects close to both the strobe
light and the lens. As the particle is usually out of focus, it projects
the scape of the aperture onto the film. It is a photographer's nightmare
because it spoils the photo but more annoyingly because it is never visible
when taking the photo.
In the drawing the red numbers illustrate that at half the distance
from strobe to subject, the light is four time stronger. At half that distance
again, 16 times! It decreases quadratically with distance, thus increasing
dramatically towards to the strobe.
Fortunately a number of approaches can
be followed to reduce its devastating effect:
Move
the strobe backward. This can often easily be done using the standard strobe
arm. Its effect is dramatic, specially for wide angle lenses. At
the same time this results in more even lighting. Note that for
very wide angle lenses (fisheye, 13mm) the camera will soon be in the way
of the light, resulting in an unwanted shadow of the photographer's head.
In wide angle photography think of the strobe as your fill light, painting
the colours and no more.
Move the strobe further out. This requires a specially long arm or a buddy.
By enlarging the distance, the lighting is no longer frontal but strongly
sideways. A larger distance changes the quality of the light and makes
it more blue. Note that the further out your subject is and the larger,
the further the strobe arm should be extended. It is not unusual to have
a 1.5m strobe pole for lighting models and parts of shipwrecks!
Move
the strobe away from the corners of the image, towards the centre of the
long side. This effect is dramatic, but it also produces unnatural looking
light. Also when turning the camera for a vertical shot, the side lighting
becomes unnatural. But a compromise position can be chosen. Many photographers
use the centre position for macro photography, as the light needs to be
brought close in for subjects close to the lens.
By using a wider aperture, the intensity of the aperture projection becomes
less and it may fade into the background intensity. But your depth of field
also becomes less. Below is an example of an impossible situation in 'snowy'
water where a macro lens of 50mm was used to capture a fleeting fur seal.
Aperture was set at f5.6 which resulted in a shutter speed of 1/125s. The
combined effect of the bright background and wide aperture removed most
scatter.
Tip: make yourself familiar shooting with a macro lens at f-4 and over
one metre distance. You'll be surprised, especially in dark places!
Arrange a lighter background, particularly in the quarter of the image
where the flashlight comes from. This can often be done. Even the sea can
serve as such a background provided that ambient light is sufficiently
allowed to expose the film.
Use a wide flash source. In the old days when flash bulbs were used, it
was not unusual to have a flash reflector of up to 30cm diameter, which
produced a softer kind of lighting. Nowadays the size of the strobe is
very small, resembling a point source. Unfortunately, it is technically
difficult to make the size of the light source larger. A large screen or
reflector is also rather cumbersome under water.
Blinker the flash beam by placing a blinker or baffle between the flash
and the lens. This method is cumbersome and won't work well.
Use more available light. By using the filtering techniques described later,
the amount of flash light can be reduced by half, allowing for less strobe
light and more ambient light. This is both easy to do and dramatic in result.
Use continuous light instead of strobe light and longer shutter speeds
of between 0.1 and 1 seconds. The moving particles will then not be recorded.
This method has given stunning results in estuaries with less than 1m visibility
but it requires a steady tripod, still subjects, a movie light and some
experience.
What is the ideal strobe? The strobe is an inseparable part of underwater photography and you
will buy one as soon as you have decided on what camera to buy. So what
are the ideal strobe's characteristics?
Fast recharging: the faaster the better, so you can make repetitive
shots. 1-4 seconds
Small size and light weight: this is a compromise. Obviously a powerful
strobe must have bigger batteries and a bigger capacitor and a bigger light
bulb, so it comes in a bigger housing.
Reliable and rugged: the strobe will always be more rugged than
your camera.
Through-The-Lens exposure control: The camera controls the strobe.
Very important for improving your success rate. Macro photography depends
on it entirely. Take extreme care when mixing brands. A Nikon camera may
not work well with a non-Nikon strobe. Modern cameras have very sophisticated
flash strategies.
Inbuilt slave circuit: so that the strobe will trigger even though
not connected to the camera. This enables you to take photos with two or
more strobes, and the strobe can be held by the buddy or model.
Inbuilt exposure control zoom: when used on its own in slave mode,
the strobe must be able to control its own output depending on the amount
of light returned from the subject. Camera and remote strobe must agree
on film speed and aperture setting.
At least guide number 30 or 60: the guide number is standardised
at a film speed of 100 ASA and distance in metres. Thus GN 30 means f11
at 3m, f16 at 2m, f32 at 1m. Note however that guide numbers are often
slightly exaggerated and that underwater in temperate seas much light is
absorbed by plants.
4 energy settings: energy settings are not so important anymore
because they belong to the era of guessing strobe strength and setting
it manually. However, the inbuilt 'zoom' function mentioned above, MUST
have several energy settings, like f4, f5.6, f8, f11, f16 for mixed-light
situations.
Inbuilt search light: An inbuilt search light can often be placed
central to the round flash tube, giving precise direction. However, this
light runs from the strobe batteries and may consume most of their energy.
Make sure this light is of the latest type, preferably with thrifty LED
bulbs.
External filter holder: the use of filters in underwater photography
is not common, and you won't find a strobe with such feature. Read the
tips
and tricks chapter to make your own.
Barn doors: barn doors are external flaps to narrow the beam
and although common in the studio, are seldom used underwater.
Large reflector: old flash bulb strobes had large reflectors, which
produced soft shadows and a threedimenional look. Present-day strobes are
housed in cylindrical housings that are as bulky as their reflectors. Large
reflectors have disappeared and it is difficult to make your own.
Wide angle: if you have a wide angle lens, you must have a wide
angle strobe. Be suspicious of diffusers because these do not (cannot!)
produce even lighting. Yet for macro photography you may need another,
smaller strobe.
Plug and unplug in the water: in the old days it was possible to
plug and unplug strobes in the water because the camera presented only
a make-contact without voltages. Present-day strobes, however, present
a number of signals to and from the strobe, often at high voltages and
impedance. A single droplet of salt water can now seriously upset the reliability
of your strobe. It is not a desirable situation, though.
f035222: a mother fur seal photographed under impossible
conditions in a 'snowy' sea with less than 10m visibility and a 50mm macro
lens. By using a wide aperture F5.6, the background became bright enough
to hide most scatter. Also the shutter speed became fast enough. Note how
the seal's body fades away, not distracting from the seal's eyes.
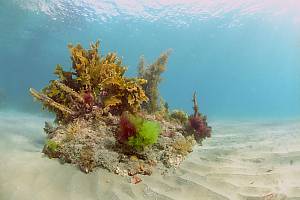
f034008: rock 'bommy' with varied seaweeds amongst sand ripples,
photographed with a fisheye 13mm lens. The strobe was used to bring colour.
No colour filter was used because of the short distance to the subject.
Scatter disappeared because the strobe arm was long and bent backward,
while also the background was kept light. f5.6 1/125s.
Loss of
colour Water
particles interact with light by absorbing certain wave lengths (see diagram).
First the reds and oranges disappear, later the yellows, greens and purples
and last the blue. Loss of the colour red is dramatic and is already noticeable
at 50cm! At 5 metres depth some 90% has disappeared. Since the loss
of colour varies critically with distance, it is necessary to make corrections
by applying colour correction filters. Their use is described later on
and their effect is quite substantial. Note that colour filters applied
under water, do not taint the blue background, but when they are applied
in the computer or in the laboratory, they do.
The picture shows that it is the total light path that matters. In the
case of the strobe, this amounts to about twice the subject distance whereas
for ambient light it amounts to depth plus subject distance.
The diagram on right gives accurate light extinction figures for one
metre water. Where clear oceanic water (probably with visibility 50m) gives
40% loss in red light per metre (blue curve), the light remaining (transmission)
is thus 60%. For two metres it would be 60% of 60% remaining, = 36%. Clear
oceanic water has its least loss in the blue colour, which means that distanct
objects would look blue. As a rule of thumb remember that you lose one
f-stop (50%) in the reds for one metre light path. So a subject at 50cm
distance from the strobe already loses that one f-stop.
Average coastal water extinction in the reds (green curve) is about
70%, thus transmission is 30%. Over 2 metres the remaining red light is
30% x 30% = 9%. The dip of this curve rests in the green wavelengths, which
makes distant objects look green.
Loss
of intensity This
graph shows actual measurements of light intensity (in f-stops) as it decreases
with depth (in metres). The measurements were done in northern New Zealand
towards the end of February, our summer in the southern hemisphere. Although
well on its return to winter, the sun still stands high in the sky, causing
minimal loss of light directly under the surface: just under two f-stops.
In the tropics only one f-stop is lost, which can be traded off for finer
grained film. In temperate seas it is common sense to use faster film like
400ASA. In mid-winter when the sun stands low in the sky, or in early morning
or evening, the loss of light can be dramatic, amounting to 4 f-stops!
The two measurements demonstrate the dramatic loss of light due to poor
visibility (red squares), compared to good visibility (blue triangles).
At 30m depth in poor visibility, almost no natural light photography can
be done on moving objects. Yet, using a tripod combined with fill flash,
remarkable results can be obtained, even at -9 f-stops with shutter speeds
of 1 second or longer!
camera
angles How
to aim your camera is of critical importance underwater. The diagram serves
to give you a feel of what the consequences are of your position in the
water and the way you aim your camera. Read it with care.
a The camera faces down, close to the surface.
Although this is a most convenient way of taking photos, you have serious
problems:
Close to the surface the plankton skeletons and dead animals collect, and
there are bubbles from waves - a rich source of scatter.
You have the light coming from right behind and this is the worst angle
to show up scatter from all three sources: Rayleigh (molecules), mist and
snow.
Frontal lighting of the underwater world does not show its form. There
is also little contrast.
The light path from camera to subject to surface is maximal, thus everything
looks at its worst - blue
You are furthest away from your subject, causing unsharpness
You are in the place where the water moves most, inviting for motion blur.
b This is an acceptable position and angle.
You are close to your subject which is side-lit for maximal contrast and
shape recognition. The light path from camera to surface is shortest. Your
subject is positioned against a dark background. But the dark background
may accentuate scatter from the strobe.
c Your camera is looking up towards the light,
and although you gain from the benefits of position b, you'll have
some problems.
The top of your picture looks very bright and the bottom very dark. There's
so much contrast that it cannot be reproduced on film or print. The water
looks white.
You look at the dark side of your subject. There is no colour or registration
of detail. But this can be an ideal position for photos of jellyfish, as
long as the background is evenly dark. Don't use a strobe.
d The subject has been placed between camera
and light source, which reduces most of the light and contrast problems.
You may see an aura of cathedral light shining around your subject, particularly
when using a wide angle lens. Because you are looking towards the light,
scatter is minimal. Animals with translucent parts (jellyfish, fins, eyes)
may cause spectacular images. In deeper water Snell's circle may show while
also the water has more colour. But you may have problems.
The subject is silhouetted black against a very bright background, showing
neither colour nor detail, but a fill flash can fix this while causing
the least scatter.
Water ripples may spoil the effect, creating a large white background.
e Has fewer disadvantages than c since
the camera looks into a bland bright space without a large contrast between
light and dark. Always try this possibility. A fill flash is needed for
opaque subjects since their sides are poorly lit. Because of the light
background, scatter is minimal.
f The camera now looks more at the distant
blue sea, while the subject is lit from its side. Such images give stark
graphic effects with blue backgrounds.
g This is the position and angle to capture
cathedral light, particularly when a wide angle lens is used. Notice that
the camera hides just in the shade and that the subject must appear in
the light or twilight zone. Move around and study the effect as your position
changes.
h You are looking through a shaded patch of
water towards the subject which appears in the light. The water appears
unusually clear because there is no scatter from water molecules or particles.
Your image becomes sharper too. With a bit of luck the rock face may form
a natural frame for your subject. Look for this effect, which depends also
on the type of lens used. A 35mm (!) lens can achieve surprisingly pleasing
results. The following problems may occur:
Using the strobe will spoil the effect, as it introduces scatter projected
against the dark parts of the natural frame. Move the strobe to the side
with most light.
Your presence inside a cave will stir up copious amounts of dust. Take
all the time to avoid this.
Your bubbles will race along the ceiling, causing particles to rain down.
You may have to hold your breath for a long time.
Why do professionals prefer coral seas? Professionals have a job to do, photos to sell and for them time is
money and quality is a must. So they all do their work in warm tropical
seas. Why?
Theres much more light: so you can use a finer film and have more
depth of field
Theres much more visibility: the water looks deep blue; the subject
is always sharp, up to 10m away; theres no scatter to ruin your picture.
People love to be in these places and they love such pictures. So they
sell well.
The situation is dependable: tropical seas rarely have plankton
blooms; the weather is better; the reefs are sheltered; seasons are weak.
The sea creatures are more colourful: it makes your pictures just
so much nicer; there are also more interesting creatures.
The diving is pleasant: no more wetsuit or weightbelt; the water
is so agreeable; the sun shines most times. You can work longer hours in
the water. Time is money.
 The
shape of the water is decisive on how the light passes through it. Coming
from an optically less dense medium (air) and entering a denser one (water),
the light is partly reflected back while partly entering the water. Depending
on the shape of the water, the light forms crinkle patterns or becomes
diffused randomly in all directions.
The
shape of the water is decisive on how the light passes through it. Coming
from an optically less dense medium (air) and entering a denser one (water),
the light is partly reflected back while partly entering the water. Depending
on the shape of the water, the light forms crinkle patterns or becomes
diffused randomly in all directions. The
diagram shows the theoretical loss of light due to reflection. The top
left quarter shows sun rays reaching the water's surface. The top right
quarter shows the amount of light reflected and the bottom right quarter
that of light transmitted. The hours shown are not those of the clock but
of the height of the sun. Only at angles less than 30º with the horizon
('four-o-clock') is the light reflectance significant and does loss of
light become noticeable under water. However, in practice, and perhaps
due to waves and the light diminishing towards sunset/dawn, the light under
water diminishes much more quickly. At 'four-o-clock' one loses a complete
f-stop (50%).
The
diagram shows the theoretical loss of light due to reflection. The top
left quarter shows sun rays reaching the water's surface. The top right
quarter shows the amount of light reflected and the bottom right quarter
that of light transmitted. The hours shown are not those of the clock but
of the height of the sun. Only at angles less than 30º with the horizon
('four-o-clock') is the light reflectance significant and does loss of
light become noticeable under water. However, in practice, and perhaps
due to waves and the light diminishing towards sunset/dawn, the light under
water diminishes much more quickly. At 'four-o-clock' one loses a complete
f-stop (50%).
 The
water's surface has further consequences for how light continues its path.
The diagram shows how light is broken (diffracted) by the surface. A vertically
incident ray passes without breaking but as the incident angle (height)
becomes less, the light ray is bent to descend more steeply. Finally, light
from the horizon passes at an angle of about 45 degrees or more precisely
half of Snell's Angle, named after the Dutch astronomer Snell who discovered
and described this effect (see separate box). To photograph the full circle
from below, one needs a fish-eye lens of focal lens less than 12mm. A 15mm
wide angle lens captures a good part of it.
The
water's surface has further consequences for how light continues its path.
The diagram shows how light is broken (diffracted) by the surface. A vertically
incident ray passes without breaking but as the incident angle (height)
becomes less, the light ray is bent to descend more steeply. Finally, light
from the horizon passes at an angle of about 45 degrees or more precisely
half of Snell's Angle, named after the Dutch astronomer Snell who discovered
and described this effect (see separate box). To photograph the full circle
from below, one needs a fish-eye lens of focal lens less than 12mm. A 15mm
wide angle lens captures a good part of it.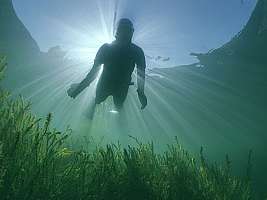
 The
Dutch astronomer Willebrord van Roijen Snell (1580-1626) discovered the
important law of light diffraction between two media having differing refractive
indexes or optical densities or light speeds. The Dutch physicist Christiaan
Huyghens later formulated other optical laws in his treatise on light.
Snell formulated that light is refracted (bent) towards the optical axis
perpendicular to the plane between the media when going from a less dense
to a denser media so that
The
Dutch astronomer Willebrord van Roijen Snell (1580-1626) discovered the
important law of light diffraction between two media having differing refractive
indexes or optical densities or light speeds. The Dutch physicist Christiaan
Huyghens later formulated other optical laws in his treatise on light.
Snell formulated that light is refracted (bent) towards the optical axis
perpendicular to the plane between the media when going from a less dense
to a denser media so that
 The way light
diffuses as it interacts with matter, depends on the size of the particles.
For the ultra small water molecules, blue light is bounced off in all directions
equally, while the rest of the light passes through normally. This diffusion
was described by the physicist Rayleigh and explains why both the sky and
the sea look blue. The diffused blue light appears to come from all directions,
particularly deeper down and it has the effect of reducing contrast
while dominating the natural colours.
The way light
diffuses as it interacts with matter, depends on the size of the particles.
For the ultra small water molecules, blue light is bounced off in all directions
equally, while the rest of the light passes through normally. This diffusion
was described by the physicist Rayleigh and explains why both the sky and
the sea look blue. The diffused blue light appears to come from all directions,
particularly deeper down and it has the effect of reducing contrast
while dominating the natural colours.
 Strobelight
scatter is caused by brightly lit small objects close to both the strobe
light and the lens. As the particle is usually out of focus, it projects
the scape of the aperture onto the film. It is a photographer's nightmare
because it spoils the photo but more annoyingly because it is never visible
when taking the photo.
Strobelight
scatter is caused by brightly lit small objects close to both the strobe
light and the lens. As the particle is usually out of focus, it projects
the scape of the aperture onto the film. It is a photographer's nightmare
because it spoils the photo but more annoyingly because it is never visible
when taking the photo.
 Move
the strobe backward. This can often easily be done using the standard strobe
arm. Its effect is dramatic, specially for wide angle lenses. At
the same time this results in more even lighting. Note that for
very wide angle lenses (fisheye, 13mm) the camera will soon be in the way
of the light, resulting in an unwanted shadow of the photographer's head.
In wide angle photography think of the strobe as your fill light, painting
the colours and no more.
Move
the strobe backward. This can often easily be done using the standard strobe
arm. Its effect is dramatic, specially for wide angle lenses. At
the same time this results in more even lighting. Note that for
very wide angle lenses (fisheye, 13mm) the camera will soon be in the way
of the light, resulting in an unwanted shadow of the photographer's head.
In wide angle photography think of the strobe as your fill light, painting
the colours and no more. Move
the strobe away from the corners of the image, towards the centre of the
long side. This effect is dramatic, but it also produces unnatural looking
light. Also when turning the camera for a vertical shot, the side lighting
becomes unnatural. But a compromise position can be chosen. Many photographers
use the centre position for macro photography, as the light needs to be
brought close in for subjects close to the lens.
Move
the strobe away from the corners of the image, towards the centre of the
long side. This effect is dramatic, but it also produces unnatural looking
light. Also when turning the camera for a vertical shot, the side lighting
becomes unnatural. But a compromise position can be chosen. Many photographers
use the centre position for macro photography, as the light needs to be
brought close in for subjects close to the lens.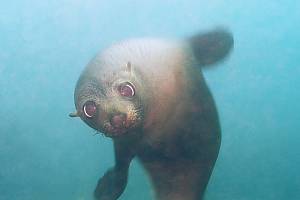
 Water
particles interact with light by absorbing certain wave lengths (see diagram).
First the reds and oranges disappear, later the yellows, greens and purples
and last the blue. Loss of the colour red is dramatic and is already noticeable
at 50cm! At 5 metres depth some 90% has disappeared. Since the loss
of colour varies critically with distance, it is necessary to make corrections
by applying colour correction filters. Their use is described later on
and their effect is quite substantial. Note that colour filters applied
under water, do not taint the blue background, but when they are applied
in the computer or in the laboratory, they do.
Water
particles interact with light by absorbing certain wave lengths (see diagram).
First the reds and oranges disappear, later the yellows, greens and purples
and last the blue. Loss of the colour red is dramatic and is already noticeable
at 50cm! At 5 metres depth some 90% has disappeared. Since the loss
of colour varies critically with distance, it is necessary to make corrections
by applying colour correction filters. Their use is described later on
and their effect is quite substantial. Note that colour filters applied
under water, do not taint the blue background, but when they are applied
in the computer or in the laboratory, they do.
 This
graph shows actual measurements of light intensity (in f-stops) as it decreases
with depth (in metres). The measurements were done in northern New Zealand
towards the end of February, our summer in the southern hemisphere. Although
well on its return to winter, the sun still stands high in the sky, causing
minimal loss of light directly under the surface: just under two f-stops.
In the tropics only one f-stop is lost, which can be traded off for finer
grained film. In temperate seas it is common sense to use faster film like
400ASA. In mid-winter when the sun stands low in the sky, or in early morning
or evening, the loss of light can be dramatic, amounting to 4 f-stops!
This
graph shows actual measurements of light intensity (in f-stops) as it decreases
with depth (in metres). The measurements were done in northern New Zealand
towards the end of February, our summer in the southern hemisphere. Although
well on its return to winter, the sun still stands high in the sky, causing
minimal loss of light directly under the surface: just under two f-stops.
In the tropics only one f-stop is lost, which can be traded off for finer
grained film. In temperate seas it is common sense to use faster film like
400ASA. In mid-winter when the sun stands low in the sky, or in early morning
or evening, the loss of light can be dramatic, amounting to 4 f-stops!
 How
to aim your camera is of critical importance underwater. The diagram serves
to give you a feel of what the consequences are of your position in the
water and the way you aim your camera. Read it with care.
How
to aim your camera is of critical importance underwater. The diagram serves
to give you a feel of what the consequences are of your position in the
water and the way you aim your camera. Read it with care.